

Before you drop a wedge on a brand-new computer, you need to find the root cause of the slowdown. Sometimes it’s just bloated software you can fix for free; other times, a single aging component is choking your entire system.
Here is how to diagnose the issue in under 10 minutes and find the exact fix you need.
Step 1: The 5-Minute "Free Fix" Checklist
Before blaming your hardware, clear out the digital cobwebs. If your PC used to be fast but suddenly slowed down, try these free software fixes:
-
Trim Startup Apps: Press
Ctrl + Shift + Escto open Task Manager, go to the Startup apps tab, and disable programs you don't need running immediately at boot (like Spotify or Steam).
-
Clear Storage Space: If your main
C:drive is filled to more than 90% capacity, it will slow down drastically. Delete old downloads or use the Windows Disk Cleanup tool to free up breathing room. -
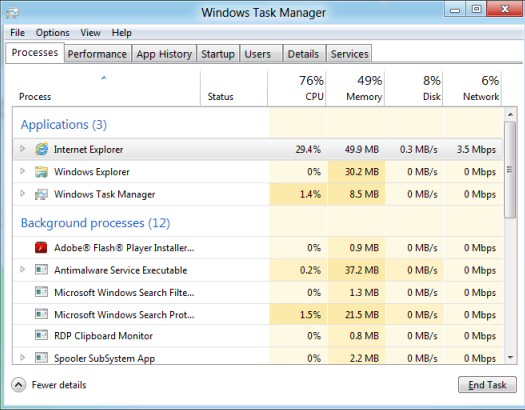
Close Resource Vampires: In Task Manager, sort the Processes tab by CPU and Memory. If a background program you aren't using is hogging 80% of your resources, close or uninstall it.
-
The Nuclear Option (Fresh Windows Install): If your PC is choked by years of hidden bloatware, registry errors, and ghost files, the fastest fix is to wipe the slate clean. Use the built-in Windows Reset feature (
Settings > System > Recovery > Reset PC) to reinstall a completely clean version of the OS.Note: Choose the "Keep my files" option if you want to save your photos and documents, but you will need to reinstall your programs. If your PC is still slow after a fresh Windows install, your hardware is officially the bottleneck.
Step 2: Open Task Manager to Find Your Hardware Bottleneck
If the software fixes didn't help, your hardware is hitting its physical limit.
To find the culprit, open Task Manager, click the Performance tab, and leave it open while you use your PC or play a game. Watch which graph spikes to 100%—that is your bottleneck.
1. Disk Usage is at 100%
If your disk stays pinned at 100% during basic tasks, you are likely running Windows on an old mechanical hard drive (HDD). Modern operating systems demand fast flash storage.
-
The Upgrade Fix: Swap your old drive for a 2.5-inch SATA SSD or an NVMe M.2 SSD. This reduces boot times from minutes to seconds and makes the entire OS feel instantly snappy. If you are looking to upgrade your drive, some great value to performance drives can be found here.
2. Memory (RAM) Usage is Over 90%
RAM is your PC’s short-term workspace. When you run out of it, Windows borrows slow storage space to use as fake RAM, causing massive stuttering and freezes.
-
The Upgrade Fix: Upgrade to a 16GB or 32GB DDR4/DDR5 RAM kit. It’s cheap, easy to install, and immediately restores smooth multitasking. Check out our range of RAM here for affordable, great value upgrades.
3. CPU Usage is Pegged at 100%
Your processor is the brain of the system. If it hits 100% while running basic modern tasks or games while your graphics card sits idle, it's simply too old to handle modern software weights.
-
The Upgrade Fix: It's time for a platform upgrade. Look into a modern, mid-range CPU and Motherboard (like a current-generation AMD Ryzen 5 or Intel Core i5) to build a fresh foundation. Great value AMD and Intel CPUs can be found here.
Step 3: Check for the Thermal Throttling Trap
Does your PC start up fast but crawl to a halt after 15 minutes of gaming or heavy work? You are likely dealing with heat.
When components get too hot (usually around 90°C to 100°C), they intentionally slow down to prevent themselves from melting.
-
The Diagnosis: Download a free tool like HWMonitor to check your CPU temperatures under load.
-
The Upgrade Fix: If it's running hot, use a can of compressed air to blow dust out of the fans. If that fails, buying a budget-friendly aftermarket air cooler and a fresh tube of thermal paste will restore your PC's original speed.
The Bottom Line: Don't replace your entire rig when a single target upgrade—like a swift new SSD or a bit more RAM—can wipe away years of lag for a fraction of the price.
If you don't want the pain of testing and diagnosing issues on your PC, we can help you build a custom PC to suit your exact needs, check out our PC Builder Tool here to pick your own components and get an instant quote.
If you want a guide on how to test specific hardware components, we break down our own testing processes in this article How We Test Our PC Components.


0 comments